Radar Detector Hard Wire Installation?

Has anyone been successful from the rear tap?
I'm not experienced with this but want to somehow tap the cigarette lighter in the back and use the cig lighter and have this hardwired at the same time

Uniden RDA-HDWKT Radar Detector Smart Hardwire Kit with Mute Button, LED Alert and Power LED, for Uniden R8, R7, R4, R3, R1, DFR9, DFR9BLK, DFR8, DFR7 and DFR6. https://a.co/d/h7b1i7J

Here's the one I have for the Uniden r7
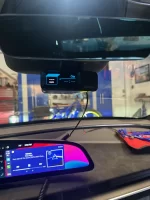
That’s what I tapped for my built in radar/laser. Pretty straightforward.
 
There is a more efficient and easier routing method to get 12V power. You can tap into the "Cabin Fuse Box" under the glovebox. Here is an excerpt from one of the earlier Dream manuals where they included the fuse information. There is a 20A fuse, "MB10 Trunk 12V Outlet", which would be a good candidate.
 

Attachments

  • Lucid Fuse Information (optimized).pdf
    279.5 KB · Views: 265
There is a more efficient and easier routing method to get 12V power. You can tap into the "Cabin Fuse Box" under the glovebox. Here is an excerpt from one of the earlier Dream manuals where they included the fuse information. There is a 20A fuse, "MB10 Trunk 12V Outlet", which would be a good candidate.
Thank you!
Is there a thread with info/pics of how it is routed or done? does it require removal of trim?

The mirror tap is one of the easiest methods. In my current vehicle, I have a uniden detector attached to the neck of the rear view camera and a 4 inch RJ45 wire to connect to the mirror connection. It require a mirror that draws power and it basically turn the RD on/off with the car.

I will have to take a closer look when I get the car. It would be great if someone can take pics of the rear view camera console.
 
Here is the long awaited information! Instructions for the mirror tap...

Here is the hardware I used. It's a 3 pack and the smallest pins fit.

You can release the front end of the plastic mirror cover using a pry tool from the middle where there is space (yellow arrow in photo) then pulling down on the sides.
NOTE I was only able to release the front end that touches the windshield which is enough. I was not able to release from the mirror end but it wasn't necessary.

The mirror tap goes red to red, black to black. Nothing goes in the brown wire pin.
The mirror tap photos are taken from the windshield side, facing in to the car. Both photos show the mirror tap already inserted.


Screenshot_20230927_203945_Gallery.jpg


20230925_173319.jpg


20230925_173245.jpg
 
Here is the long awaited information! Instructions for the mirror tap...

Here is the hardware I used. It's a 3 pack and the smallest pins fit.

You can release the front end of the plastic mirror cover using a pry tool from the middle where there is space (yellow arrow in photo) then pulling down on the sides.
NOTE I was only able to release the front end that touches the windshield which is enough. I was not able to release from the mirror end but it wasn't necessary.

The mirror tap goes red to red, black to black. Nothing goes in the brown wire pin.
The mirror tap photos are taken from the windshield side, facing in to the car. Both photos show the mirror tap already inserted.


View attachment 15148

View attachment 15149

View attachment 15150
Thanks for write up and pics!!! That's the same tap I used on my Jag and it's worked like a charm for the past two years.
 
Thanks for the write-up and pics. It would be good to note the white plastic piece where the tap is made easily comes out of its housing so it can be pulled to the passenger side for easier access. My only problem is getting the front passenger side clip to fasten.
 
What model Blendmount did you use?
 
Thanks for the write-up and pics. It would be good to note the white plastic piece where the tap is made easily comes out of its housing so it can be pulled to the passenger side for easier access. My only problem is getting the front passenger side clip to fasten.
That's very helpful information! Did you have success getting the passenger side clip to fasten?
 
That's very helpful information! Did you have success getting the passenger side clip to fasten?

Yes, but not without incident - significant frustration! When I first tried to re-fasten it, I apparently crushed it and nocked it out of its holder. I found it rattling around in the cover and had to bend it back into shape (used what I could see of the driver side clip to reshape it). I slid it back into its slot and it fastened without issue.
 
Here is the long awaited information! Instructions for the mirror tap...

Here is the hardware I used. It's a 3 pack and the smallest pins fit.

You can release the front end of the plastic mirror cover using a pry tool from the middle where there is space (yellow arrow in photo) then pulling down on the sides.
NOTE I was only able to release the front end that touches the windshield which is enough. I was not able to release from the mirror end but it wasn't necessary.

The mirror tap goes red to red, black to black. Nothing goes in the brown wire pin.
The mirror tap photos are taken from the windshield side, facing in to the car. Both photos show the mirror tap already inserted.


View attachment 15148

View attachment 15149

View attachment 15150
Thanks so much for this. Noob at doing this but are you just feeding those wires in alongside an existing red and black cable or you connecting it some other way? If you didn’t remove the trim closer to the mirror how did you get the cable out?
 
Thanks so much for this. Noob at doing this but are you just feeding those wires in alongside an existing red and black cable or you connecting it some other way? If you didn’t remove the trim closer to the mirror how did you get the cable out?
I used the one with the smallest prongs. You can feed them alongside the existing red and black cables.

Once you pull the cover off near the windshield, you should be able to look up in to the area and work from thwre. As someone else mentioned you can remove the white plastic piece that the wires go to which makes it easier to work, then push it back in to the original place/clip.
 
Assuming the newer models do not have the RFID blocking windshields? It appears earlier models did.
 
I have a 2022 probably with RFID but my Uniden R7 works fine. I heard other detectors have a harder time.
 
Yes to the left of the rear view midway down no issues
 
Ok how the hell you guys get your finger in there...guess I got fat fingers geez. I am working blind behind there too. Any tricks, can't figure out how to unplug it but will keep pressing on.
 

Attachments

  • image2 (2).jpeg
    image2 (2).jpeg
    1.3 MB · Views: 89
Ok how the hell you guys get your finger in there...guess I got fat fingers geez. I am working blind behind there too. Any tricks, can't figure out how to unplug it but will keep pressing on.
I put the cap from a spray paint can in between the windshield and plastic housing to keep it open while i worked. The white plastic piece just slides down and out without resistance. I also wore one of those head band led lights to get a better view of what I was working with. But you're right, there is very little space to maneuver.
 
For those who have a Uniden R7 radar detector, the correct Blendmount or one that works is the BR7-2014. Just tell em it's for a 2020 BMW M3. Still battling with the damm plug....it is so tight back there. LucidJazz thanks for the tip with the cap and that hasn't helped yet. Also based on the location of the radar detector it works fine there too. I heard early on some detectors didn't work except the Unidens.
 

Attachments

  • image0 (14).jpeg
    image0 (14).jpeg
    1.4 MB · Views: 81
Back
Top