- Joined
- May 16, 2024
- Messages
- 1,060
- Reaction score
- 1,107
- Cars
- '26 Gravity GT
@DeaneG I have a question for you. Others feel free to chime in.
Since I'm hopeful that my Gravity will be delivered this year, I'm trying to finalize installation of a LHCS.
I'm hoping the electrician I hire will know this information and possibly have installed an LHCS before.
Either, I still like to have a general understanding of how the installation should be done.
Especially the compression lugs I've read posts about members having issues with them.
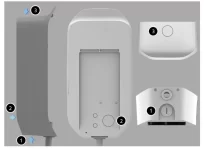
In the LCHS Installation Guide, on p. 15, the electrical wiring information mentions input directions 1, 2, or 3 and opening a cap.

In a 2024 post, @coma24 shows pictures of their installation.
In the sixth picture in that post, it looks like they used input direction 1.

I am considering using input direction 2 (back entry).
However, In this post from 2022, you say "typically you'd bring in the wire through the backside of the LHCS in a case like this, though you'd have to use a hole saw to drill a 1-3/8" hole in its plastic housing, easy to damage the unit".
When you say "backside" do you mean input direction 2?
When I look at the picture in the guide, input 1 seems to have a pre-drilled hole; inputs 2 and 3 do not.

However, the guide directions say to "Choose the input direction 1, 2, or 3 and, open the cap".
If the input is a cap to be opened, why is drilling necessary?
I'm hoping to avoid damaging the charger, as you mentioned.
BTW, I also hope to use the back of the charger for the entry of an ethernet cable, using one of the grommets.
Related to that, why are there two holes for the ethernet grommet?
If there is something in the 200 posts in this thread before mine, please reference it.
If I'm asking something already asked here, I apologize. Two hundred threads is a lot to read through.
Since I'm hopeful that my Gravity will be delivered this year, I'm trying to finalize installation of a LHCS.
I'm hoping the electrician I hire will know this information and possibly have installed an LHCS before.
Either, I still like to have a general understanding of how the installation should be done.
Especially the compression lugs I've read posts about members having issues with them.
In the LCHS Installation Guide, on p. 15, the electrical wiring information mentions input directions 1, 2, or 3 and opening a cap.
In a 2024 post, @coma24 shows pictures of their installation.
In the sixth picture in that post, it looks like they used input direction 1.
I am considering using input direction 2 (back entry).
However, In this post from 2022, you say "typically you'd bring in the wire through the backside of the LHCS in a case like this, though you'd have to use a hole saw to drill a 1-3/8" hole in its plastic housing, easy to damage the unit".
When you say "backside" do you mean input direction 2?
When I look at the picture in the guide, input 1 seems to have a pre-drilled hole; inputs 2 and 3 do not.
However, the guide directions say to "Choose the input direction 1, 2, or 3 and, open the cap".
If the input is a cap to be opened, why is drilling necessary?
I'm hoping to avoid damaging the charger, as you mentioned.
BTW, I also hope to use the back of the charger for the entry of an ethernet cable, using one of the grommets.
Related to that, why are there two holes for the ethernet grommet?
If there is something in the 200 posts in this thread before mine, please reference it.
If I'm asking something already asked here, I apologize. Two hundred threads is a lot to read through.