This post details my recent LUCID CONNECTED HOME CHARGING STATION (LCHC) installation — hopefully it helps others who were in a similar situation as me.
Initially, I was confused about what type of wiring to get, and I posted my initial Forum inquiry here: https://lucidowners.com/threads/luc...on-lchc-installation-wiring.9178/#post-209471
This post details my recent LUCID CONNECTED HOME CHARGING STATION (LCHC) installation. hopefully, it helps others who were in a similar situation as me.
Initially, I was confused about what type of wiring to get, and I posted my initial Forum inquiry here: https://lucidowners.com/threads/luc...on-lchc-installation-wiring.9178/#post-209471. After further research and consulting with an electrician, I settled on the following materials for my 45-ft run between my garage installation location and my home electrical panel:
MATERIAL LIST (total cost was approx $500):
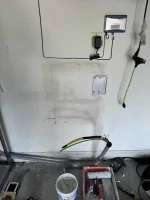
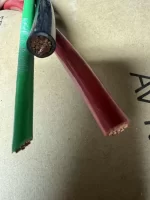
- 2ea #2 AWG Copper wire for the L1 / L2 connections. (See picture of Black and Red wires -- both are the same, but are simply different colors)
- 1ea #6 AWG Copper wire for ground connection. (See picture of Green wire)
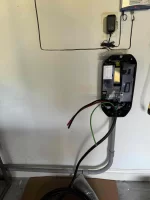
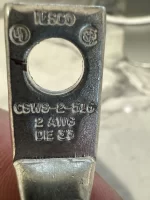
- 2ea #2 Copper conductor compression lugs (for the #2 wire connection into the LCHC)
- 1ea #6 Copper conductor compression lug (for the #6 wire connection into the LCHC)
- 1ea 100 AMP breaker box (be sure to match the manufacturer as other breaker boxes. For mine, it was GE brand)
- 50' of 1" PVC conduit, including all necessary couplings and smooth 90 degree angles (be sure not to have more than 360 degrees of total turns or the electrical inspection will not pass)
- 1" PVC clamps to secure the conduit in place
- PVC glue to secure the conduit
- optional: 2x4 stud for additional support to secure the weight of the wall charger
HELPFUL TOOLS:
- I first got an electrical permit from my local county in Virginia
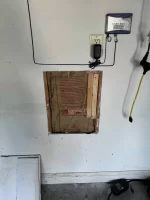
- I didn’t want to pay 3-5k to have an electrician do the whole job, so I purchased the materials myself and did all the conduit and rough wiring before bringing in an electrician. It took me about 6 hours total to do that work, but I had to go through a dozen or so ceiling rafters which tool extra time to run the conduit.
- The electrician charged $500 to connect the wires to the main panel, crimp the compression lugs, setup the LCHC box, and ensure everything worked. It took him about 2-3 hours.
- One key lesson learned: don’t run all the conduit and try to pull through turns. Instead, run the wire through the straight runs, then pull through each 90 degree bend one by one. Don’t glue everything until all the conduit is in place since it allows you to pull and disconnect as needed.
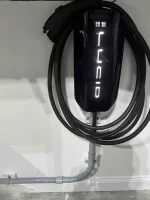
FINAL RESULTS:
Initially, I was confused about what type of wiring to get, and I posted my initial Forum inquiry here: https://lucidowners.com/threads/luc...on-lchc-installation-wiring.9178/#post-209471
This post details my recent LUCID CONNECTED HOME CHARGING STATION (LCHC) installation. hopefully, it helps others who were in a similar situation as me.
Initially, I was confused about what type of wiring to get, and I posted my initial Forum inquiry here: https://lucidowners.com/threads/luc...on-lchc-installation-wiring.9178/#post-209471. After further research and consulting with an electrician, I settled on the following materials for my 45-ft run between my garage installation location and my home electrical panel:
MATERIAL LIST (total cost was approx $500):
- 2ea #2 AWG Copper wire for the L1 / L2 connections. (See picture of Black and Red wires -- both are the same, but are simply different colors)
- 1ea #6 AWG Copper wire for ground connection. (See picture of Green wire)
- 2ea #2 Copper conductor compression lugs (for the #2 wire connection into the LCHC)
- 1ea #6 Copper conductor compression lug (for the #6 wire connection into the LCHC)
- 1ea 100 AMP breaker box (be sure to match the manufacturer as other breaker boxes. For mine, it was GE brand)
- 50' of 1" PVC conduit, including all necessary couplings and smooth 90 degree angles (be sure not to have more than 360 degrees of total turns or the electrical inspection will not pass)
- 1" PVC clamps to secure the conduit in place
- PVC glue to secure the conduit
- optional: 2x4 stud for additional support to secure the weight of the wall charger
HELPFUL TOOLS:
- 1.5” hole saw attachment to drill holes through basement walls and rafters
- Crimping tool to secure the compression lugs onto the wire (provided by Electrician)
- drill and various bits for securing the unit
- wire puller / fish tape tool to help pull the wire through conduit
- I first got an electrical permit from my local county in Virginia
- I didn’t want to pay 3-5k to have an electrician do the whole job, so I purchased the materials myself and did all the conduit and rough wiring before bringing in an electrician. It took me about 6 hours total to do that work, but I had to go through a dozen or so ceiling rafters which tool extra time to run the conduit.
- The electrician charged $500 to connect the wires to the main panel, crimp the compression lugs, setup the LCHC box, and ensure everything worked. It took him about 2-3 hours.
- One key lesson learned: don’t run all the conduit and try to pull through turns. Instead, run the wire through the straight runs, then pull through each 90 degree bend one by one. Don’t glue everything until all the conduit is in place since it allows you to pull and disconnect as needed.
FINAL RESULTS:
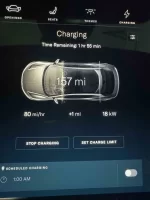
- the charger works awesome and pulls 18-20 KWs which yields between 76-80 miles per hour of charge
- The total cost was approximately $1100, but that amount will vary based on materials and how much you do yourself vs a professional
- There was no special wifi setup required, and everything just ‘worked’ after I plugged it in the first time
- The county inspector complimented the work and passed it with no questions/issues