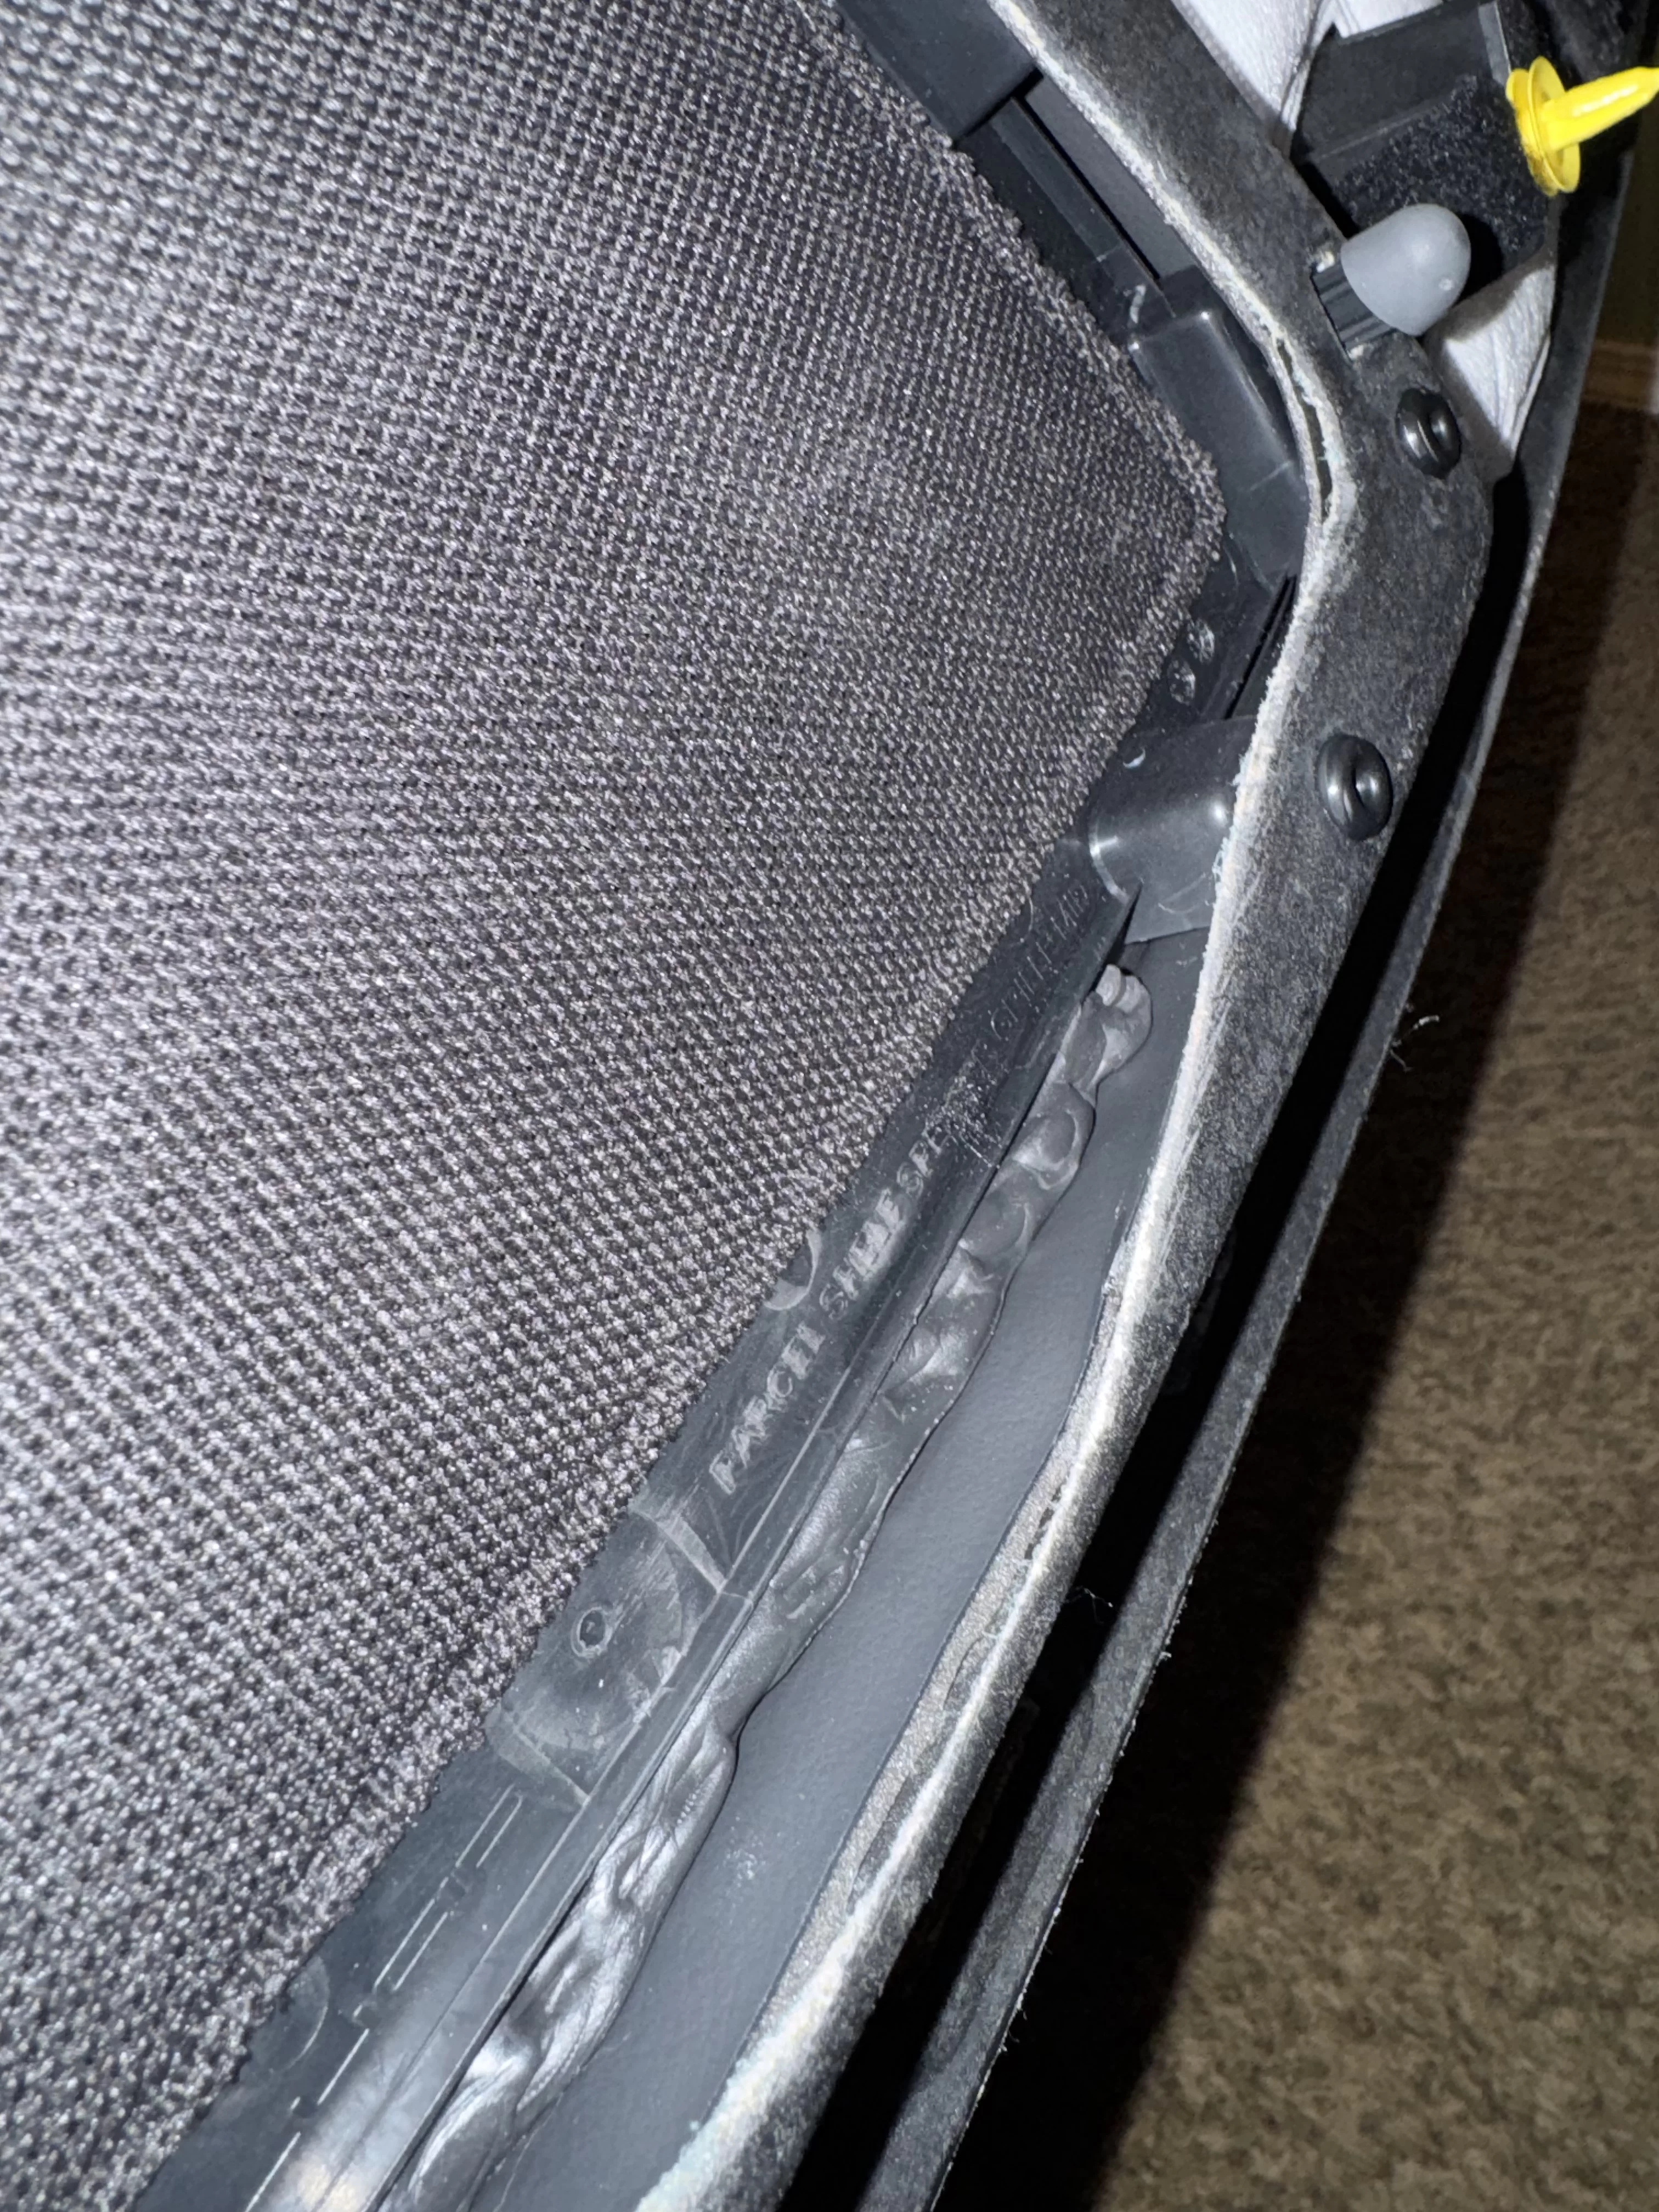
Air rear parcel shelf rattle: fixed!

socktucker

Active Member

Joined
Sep 17, 2025
Messages
3,779
Reaction score
3,396
Location
Silicone Grease It
Cars
Lucid Air
Gentlemen! Does your rear parcel shelf buzz and rattle like crazy with music? Sounds like a blown speaker but it’s not? Here’s your solution!

You MIGHT be able to do this without removing the rear shelf but if you have to, it’s easy.

I can see some steps Lucid tried to minimize the rattle-they used rubber caps on some plastic and used heat rivets on the grill backs. That doesn’t really address the problem.

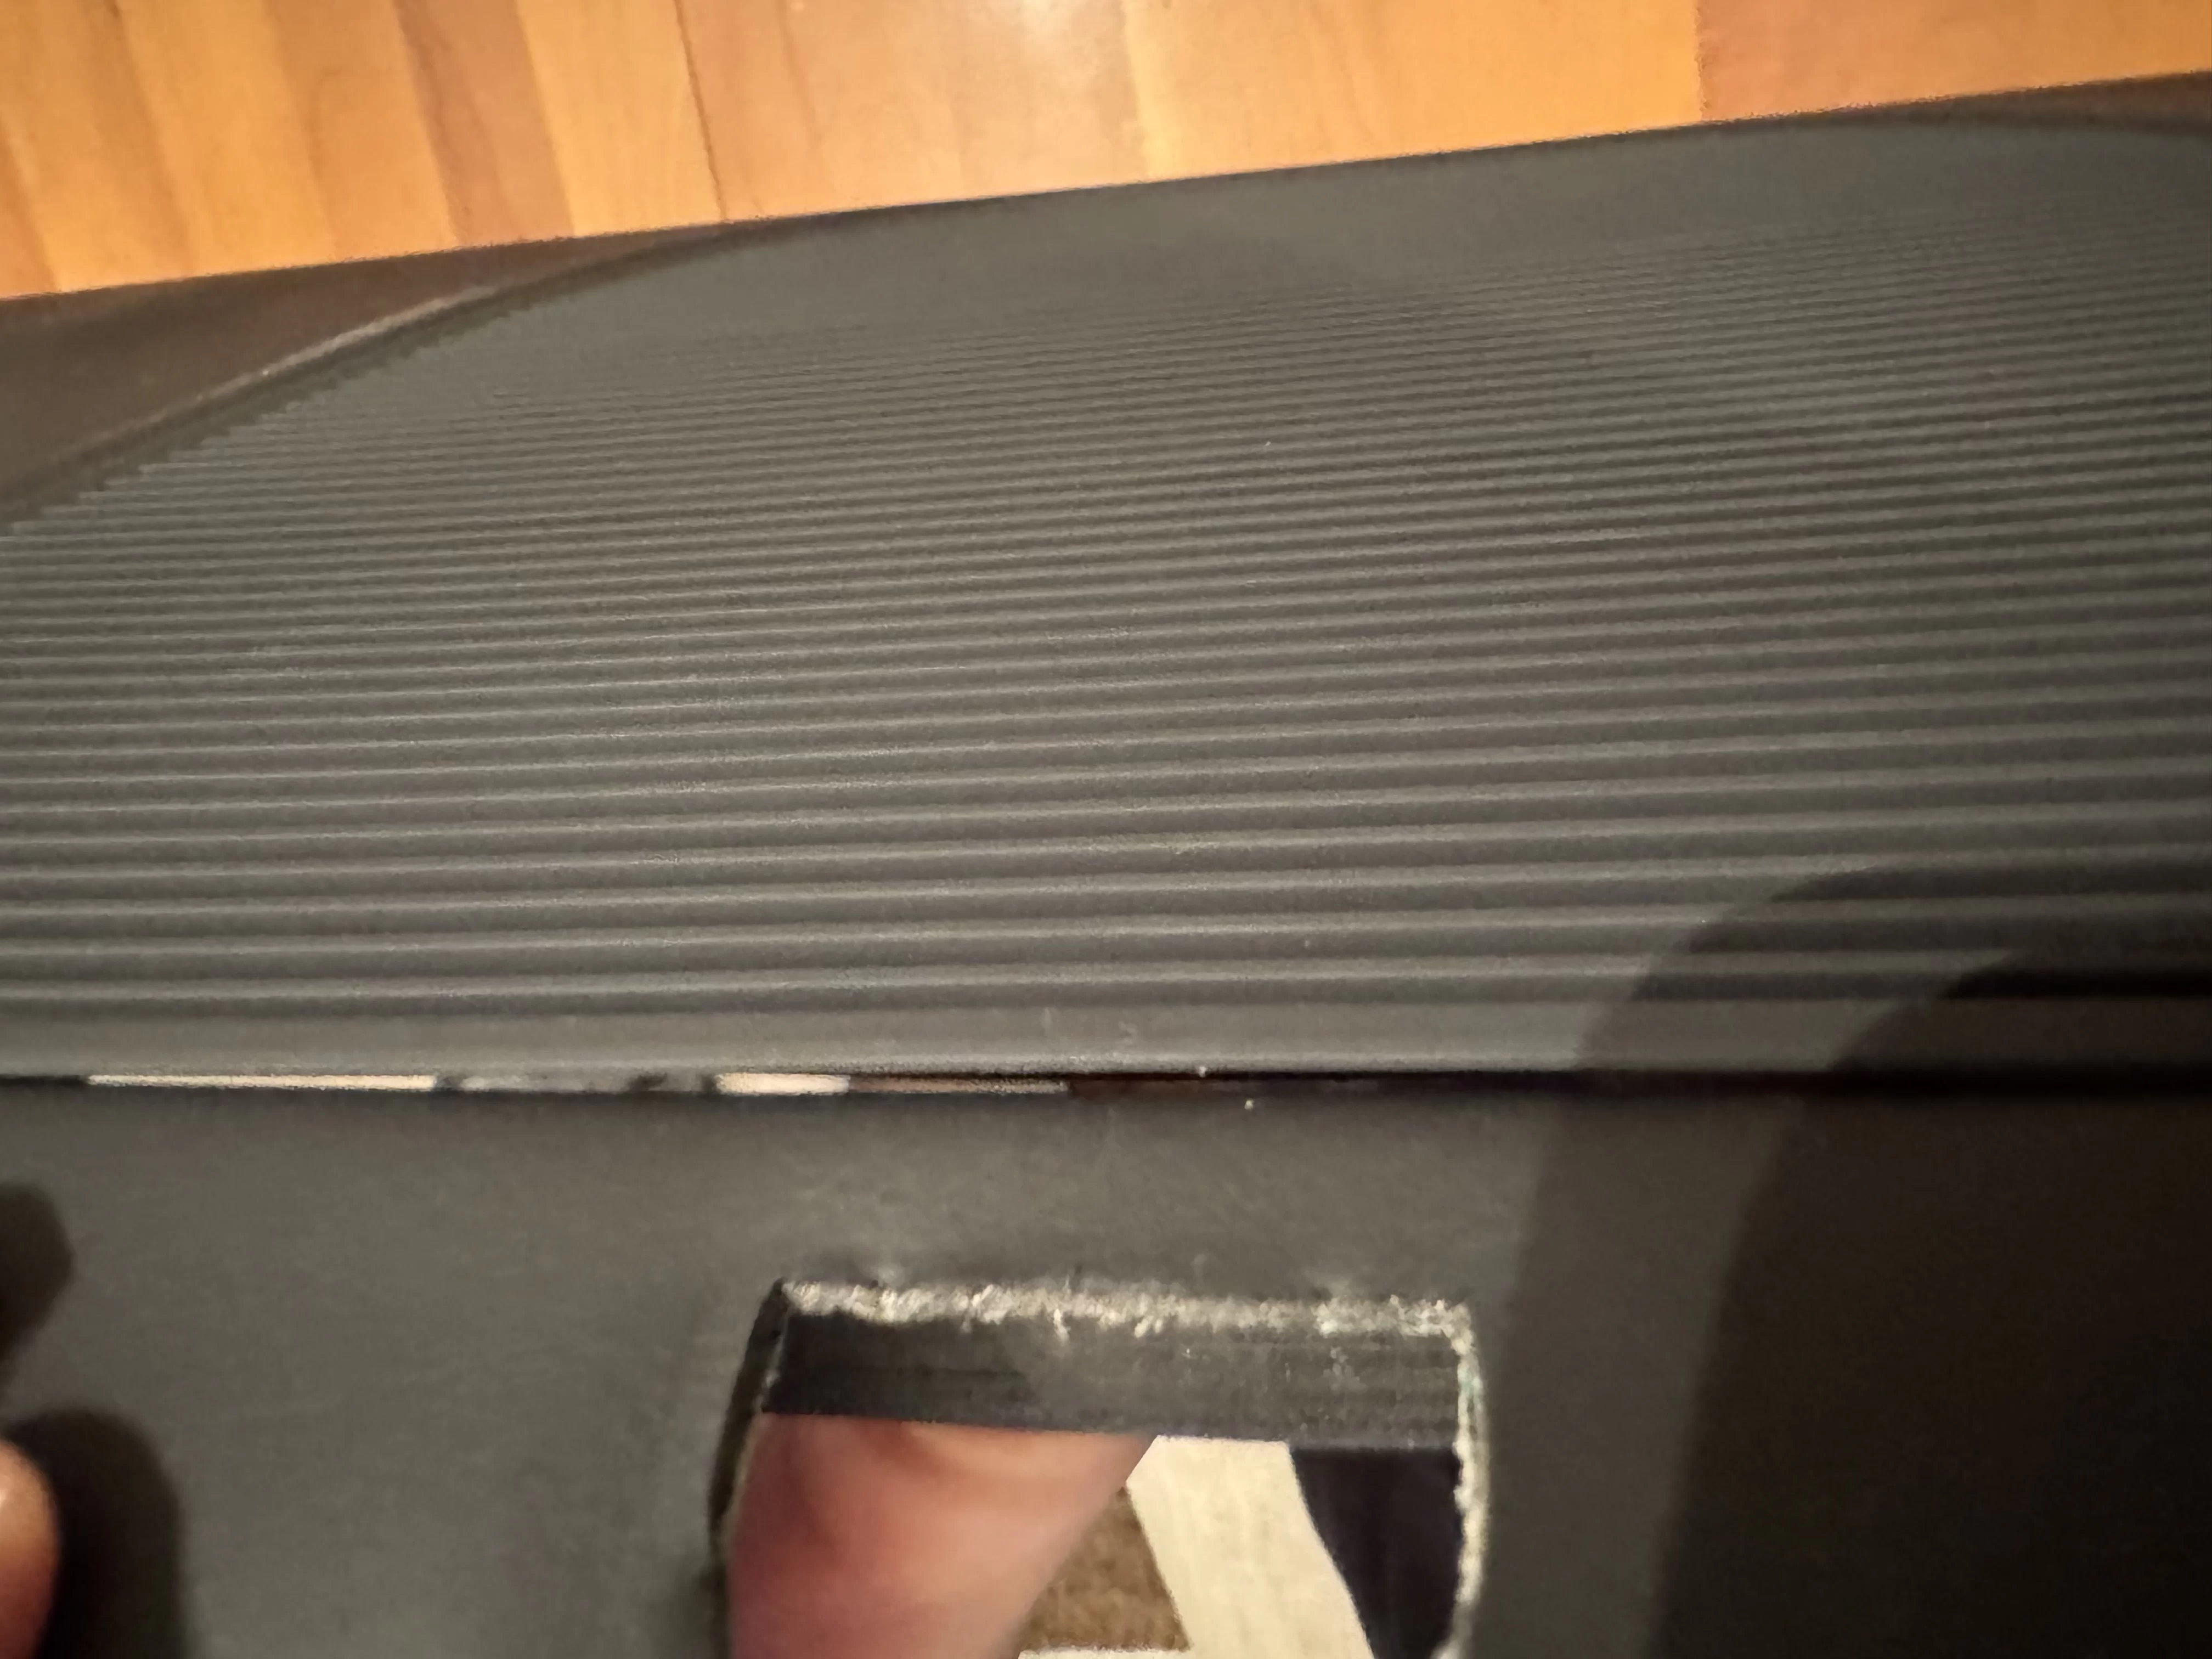
Problem 1 (biggest issue): the speaker grilles are not molded into the shelf. Instead they are an insert that are riveted. This causes the edge of the grill to vibrate against the edge of the cutout, causing rattles. See below:
IMG_2831.webp

You can fix this using “butyl rope”. You MIGHT be able to do this from the top of the panel by rolling a small rope of it and wedging in there, but it’s easier from the bottom.

To remove the shelf, fold the seats down, pop the panels off the side seat belt covers, then pop the rear shelf straight up. Pull it out, halfway reach under and disconnect the plug for the (I think) glass break sensor, which is the square hole you saw in the picture.

Flip it over. You will see the gaps, and you can hear the rattle by tapping on the grills. There are three grills.

On the back, apply the butyl rope with your fingers and push in with a flat tool of your choice. As below:
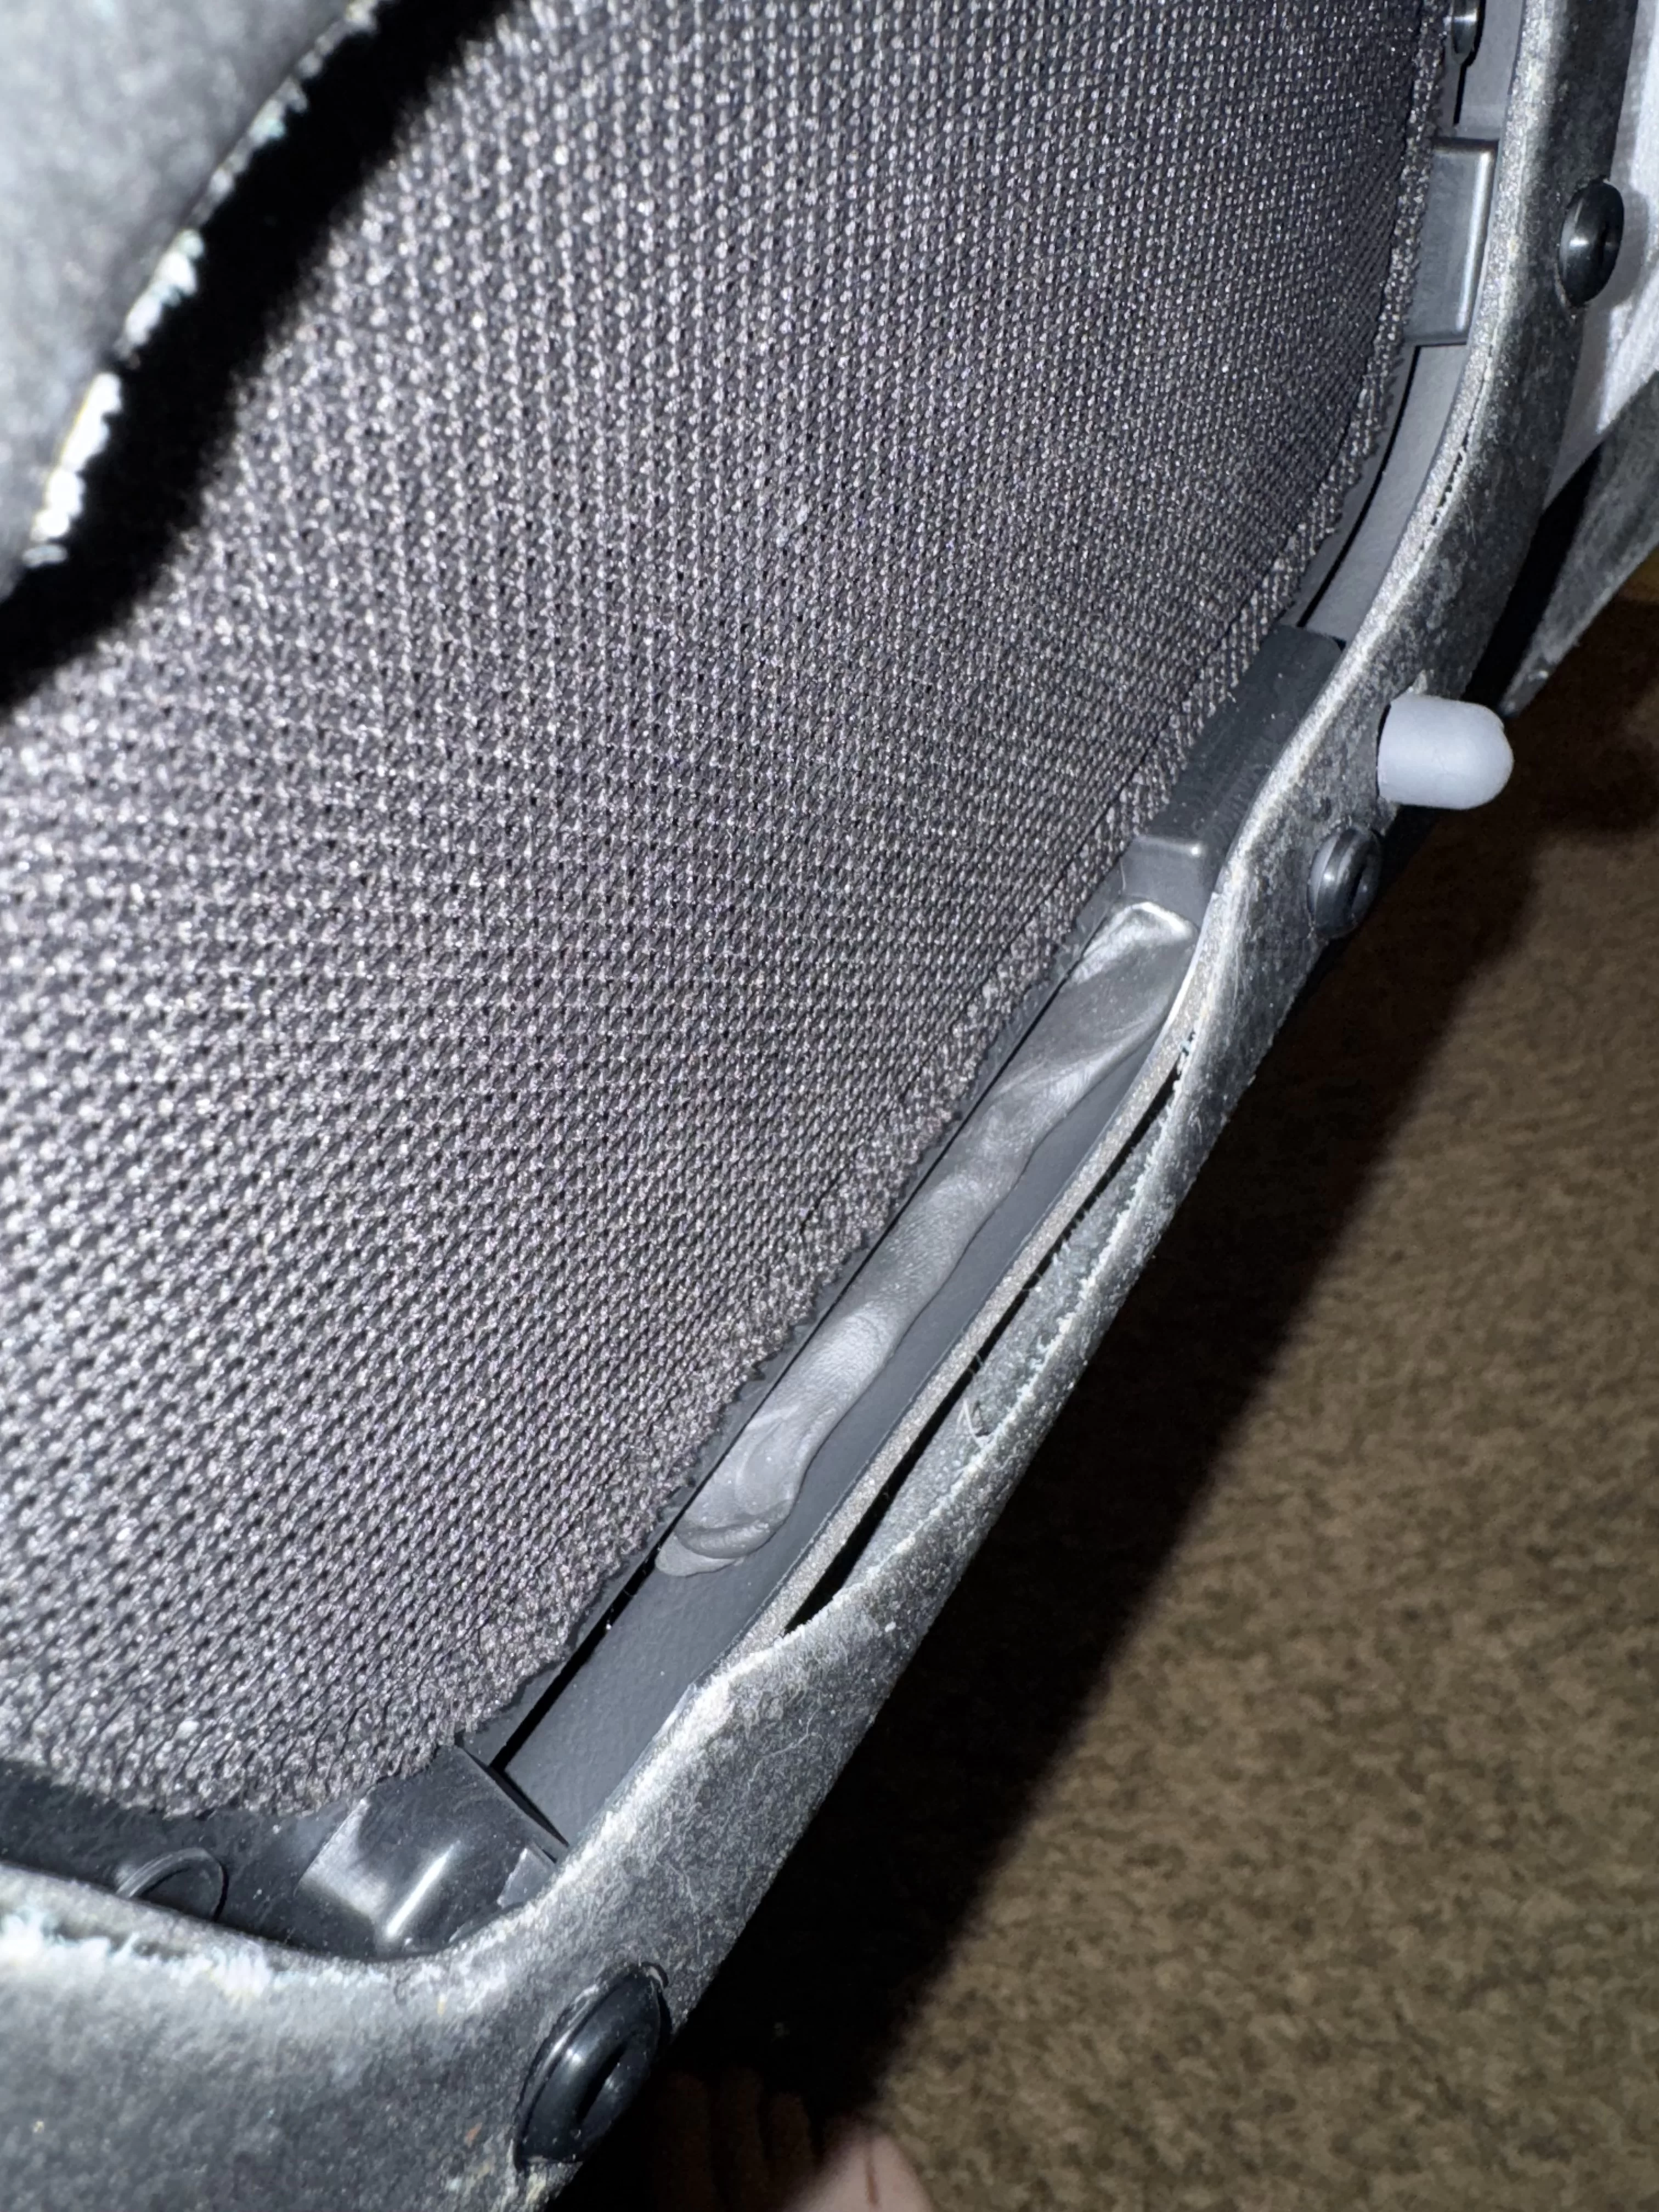
IMG_2832.webp

Press in to fill the little gap:

IMG_2833.webp

Do a few inches in the edges of all 3 on all 4 sides. Tap the grills. You should hear a dull thud instead of the rattle. You have now fixed the problem.

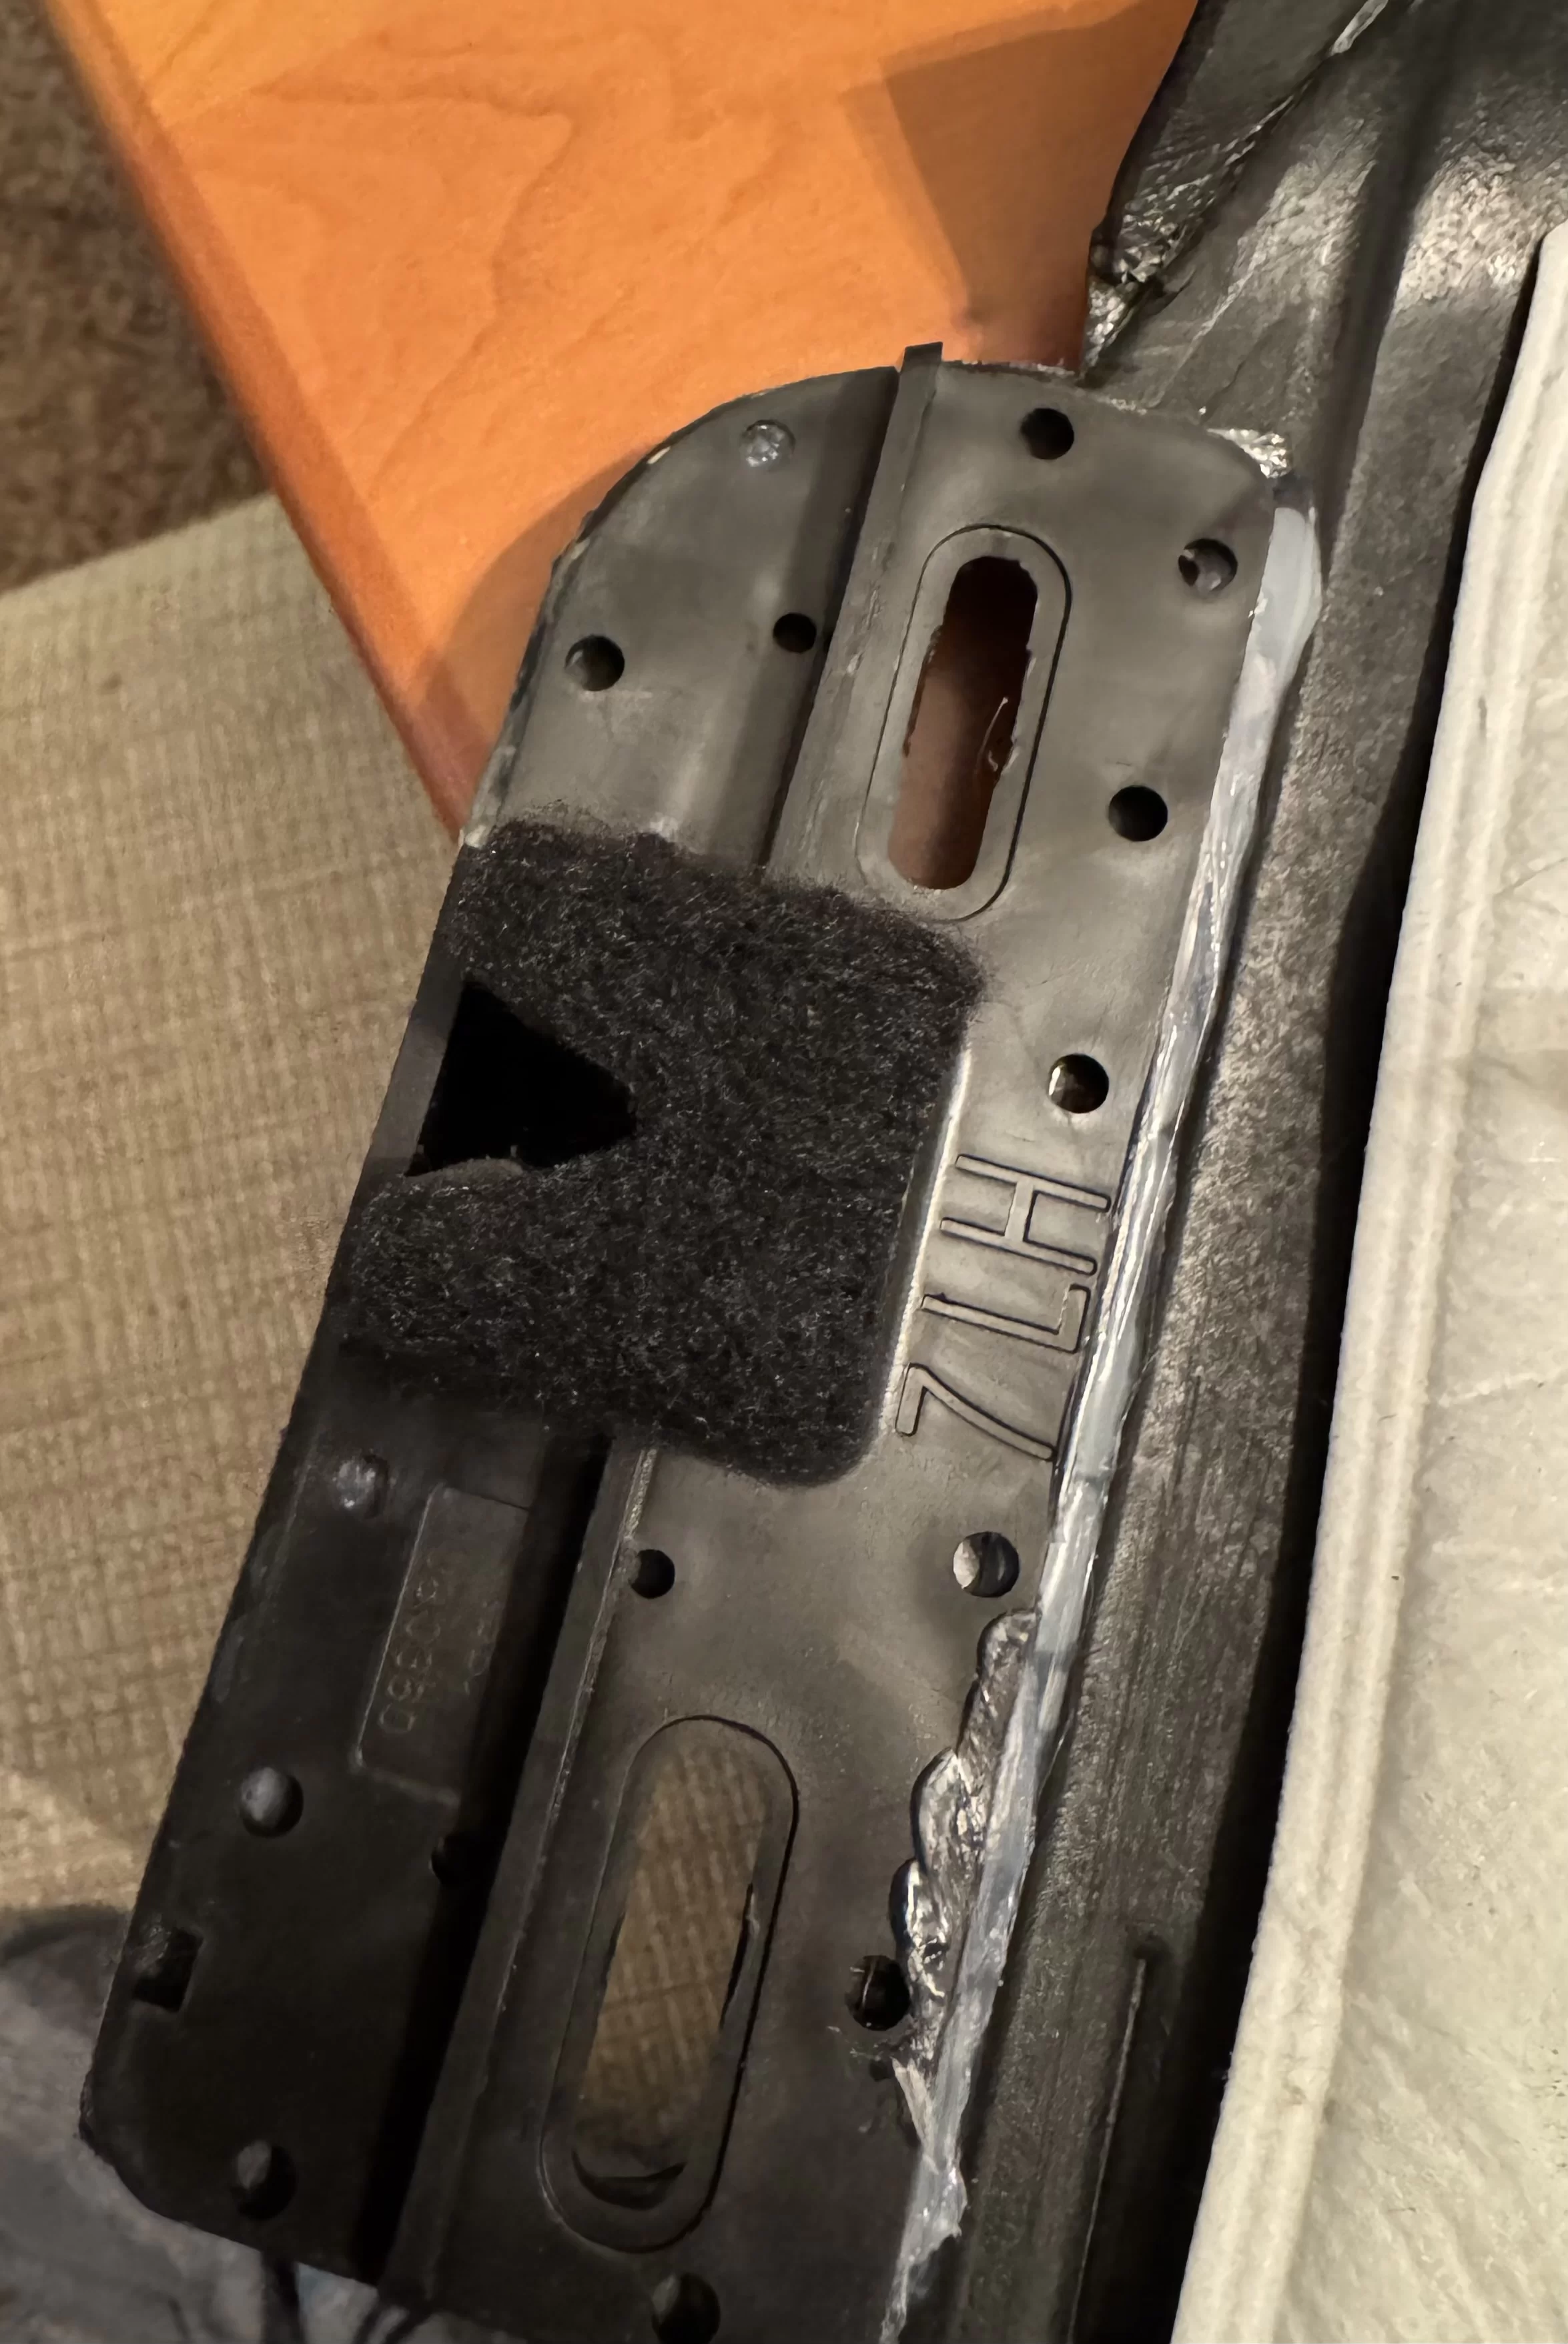
For bonus points: there is also some rattle around the 6 yello panel clips because they are slightly oversized for the attachment points. Pop them off, cut a V in some felt tape, apply tape and pop the yellow rivets back on.

IMG_2830.webp


If you want to make your life easier, buy a $10 panel popper kit on Amazon when you order your buttl rope, which is also about $10 for more than you would ever need.

Good luck! Ask any questions you might have.
 
Dude, this is awesome. I'm going to try it next weekend. It has been driving me crazy since I took delivery and paid for SSP and the rear speakers sounded like straight out of an Nissan Altima with expired temp tags. I wedged a piece of costume foam left over from Halloween between the deck and rear windshield, but I can tell the passenger side rear deck speaker rattle is coming from the grill.
 
They might do a few other things at the factory too, I had a loaner Air that didn’t have any low frequency rattles, but had some mid bass ones. Not sure what they do different but I didn’t want to take their car apart.
 
Dude, this is awesome. I'm going to try it next weekend. It has been driving me crazy since I took delivery and paid for SSP and the rear speakers sounded like straight out of a Nissan Altima with expired temp tags. I wedged a piece of costume foam left over from Halloween between the deck and rear windshield, but I can tell the passenger side rear deck speaker rattle is coming from the grill.
Did you give this a go? I’m going to need to do this but I’m having trouble visualizing how to take the deck off.
 
Did you give this a go? I’m going to need to do this but I’m having trouble visualizing how to take the deck off.
You pop the trim off by the rear seat belts, then use a panel popper on the shelf there’s like 8 plastic rivets. It’s really easy.

Note: there’s sensor mounted to the middle in the back (I think it’s a glass break sensor) you will need to reach under there and unclip the wire harness.
 
shot1.webp
Capture2.webp


A forum member reached out while working on this and I realized I never put any pics of the actual connections, so here goes!

Here are some updates pics on where to start, and what you're going for. The red is where to start popping, on the backside you can see the rivet locations.

On the 26's, there is a foam block on each side for anti-rattle, and I think a couple more clips. But the idea is the same.
 
View attachment 39553View attachment 39554

A forum member reached out while working on this and I realized I never put any pics of the actual connections, so here goes!

Here are some updates pics on where to start, and what you're going for. The red is where to start popping, on the backside you can see the rivet locations.

On the 26's, there is a foam block on each side for anti-rattle, and I think a couple more clips. But the idea is the same.
You're ended useful when you aren't on a rant(😎😉😁). Great job 👏🏾👍🏽
 
I tried this process today on my 3/23 build AGT. While I'm very grateful to socktucker for the walk through - I want to caution anyone reading this thread that this process is not as easy as this thread makes it seem, and is potentially distructive. Perhaps this is straightforward for a professional, but I cannot recommend to a trim removal novice.

I have a full trim removal kit, but it is rendered mostly useless since there is no visibility under the shelf when removing. When trying to pull up the panel, three of the fasteners were so tightly inserted that the bracket holding them to the shelf sheared off and needed to be carefully reglued. Several fasteners snapped in half. It's seemingly impossible to remove the shelf from the car without bending it or removing considerably more C pillar trim. But the hardest part is reattaching it - with the bending inherent during removal, getting the clips to line up with the holes in such tight quarters with limited visibility is absurdly challenging. And then, you need to put an incredible amount of force to get them to pop in, and at an extremely challenging angle. The whole process took about 3 days including glue time and acquiring replacement fasteners, probably about 4 man hours of actual work.

I will be able to drive the car next tomorrow, and if it's all quiet on the rear front, it'll be totally worth it - but in the future I'll absolutely be leaving this to the service center.
 
I tried this process today on my 3/23 build AGT. While I'm very grateful to socktucker for the walk through - I want to caution anyone reading this thread that this process is not as easy as this thread makes it seem, and is potentially distructive. Perhaps this is straightforward for a professional, but I cannot recommend to a trim removal novice.

I have a full trim removal kit, but it is rendered mostly useless since there is no visibility under the shelf when removing. When trying to pull up the panel, three of the fasteners were so tightly inserted that the bracket holding them to the shelf sheared off and needed to be carefully reglued. Several fasteners snapped in half. It's seemingly impossible to remove the shelf from the car without bending it or removing considerably more C pillar trim. But the hardest part is reattaching it - with the bending inherent during removal, getting the clips to line up with the holes in such tight quarters with limited visibility is absurdly challenging. And then, you need to put an incredible amount of force to get them to pop in, and at an extremely challenging angle. The whole process took about 3 days including glue time and acquiring replacement fasteners, probably about 4 man hours of actual work.

I will be able to drive the car next tomorrow, and if it's all quiet on the rear front, it'll be totally worth it - but in the future I'll absolutely be leaving this to the service center.
Make sure you’re using the panel poppers correctly, they go right at the base of the rivet

As for reinstalling, you can use a dab of silicon grease or even dish soap to help it pop back in if you don’t want to whack it.
 
Back
Top